The Water Catheter Kit

- making self-catheterizing more user friendly.

The Story
D
o
w
n
p
a
g
e
Links
Guys & Gals
The Kit
Update
Practical Matters
Disclaimer
This invention is given freely to the public domain in the hope that others with this particular affliction might find an easier management of self-cath and a healthier life.
Jock McTavish - Calgary, Canada - mctavjoc@shaw.ca

       The Story

I have self catheterized since 1996. I have MS. Self-cath is quite a nuisance. Then bouts of paresthesia (super-sensitivity) made the nuisance a painful burden. So I invented this kit. It has proved a simple effective solution. Here are details for you to make a kit and use the idea yourself. No pain. No more bladder infections. No drugs. It's no bother any more either.
I was very fortunate in that near the beginning of my bladder issues, my daughter was given a paper at college on by Dr. Clare J. Fowler.. A professor at University College London, and a consultant in Uro-Neurology her "Bladder Dysfunction in Multiple Sclerosis: Causes and Treatment" The International MS Journal, August 1994, was superlatively helpful. As a double specialist, the biological aspects were completely covered and practical issues frankly discussed. Self catheterization was described as a principle solution together with medications and other therapy. Here are a few quotes from her paper.

"The incidence of bladder symptoms in MS has been estimated at 75% with 50% of patients having persistent, troublesome bladder problems." "Bladder problems in MS are due to the spinal cord involvement which occurs in the disease." "Bladder symptoms are amongst those symptoms of MS which can be most effectively alleviated." "...63% of 170 patients had residual volumes in excess of 100 ml, only 47% of these were aware of their incomplete emptying." "Urinary tract infections may be a problem for any patient with a neurogenic bladder disorder. Symptoms of an infection, such as urgency and frequency, can be similar to those of hyperreflexia and this can lead to misdiagnosis and incorrect management."
No User Advice Available. But the main trouble was when you went looking for descriptions and help on self cath there wasn't any to be found from users. It's rather intimidating really, at the beginning. And sliding the catheter in and back out HURT! No mention of that in the pamplets - thank you very much! Probably because though well meaning, the medical people that advise you don't do this themselves. Well it makes sense it should hurt a bit. The urethra is a pretty sensitive bit of skin and catheters are a cruel sort of design. They could easily be made with smooth edged holes, but they aren't. They all have simple holes sharply cut into the silicon or latex tubing and so have 90 degree edges. So as the hole edges pass through the urethra, they scrape like a knife buttering toast!
The Issue of Sterility. Initially I was concerned about sterile conditions and used KY Jelly (a sterile lubricant). But after coming across 2 or 3 references that clean practice is satisfactory and sterile practice is not required, I began to just use simple cleaning practice with soap and water, and use ordinary hand lotion as a lubricant. No problems. Surprisingly urine itself is sterile and doesn't carry infection as does the bowel. But out of a general sense of caution and courtesy to others, I clean up with disinfectant towels when visiting, and periodically (monthly) clean every part of the kit with bleach. Clinics, hospitals and nurses use sterile practice and discard the catheters. There seems no need for a person to follow that institutional policy. One can re-use the catheters. I find that they last a couple of months. It's enough to wash up with soap and water.
How I got on this road. To back up a bit. The way I found out that I needed to do this thing was I got a really bad bladder infection and my doctor was concerned since I also for a year had had to get up a few times a night to urinate. Well its rather simple, as Dr. Fowler explains, the MS had caused failure of the signals to the bladder so it basically stayed shut until it was overfull. When it got to 750 ml there was enough pressure to void, but it would close down again quickly and 500 ml always stayed behind. That was a "warm place for bacteria to multiply" said the doctor. There are many drugs available but they have side effects and self cath sounded preferable - an easy affordable solution. It was.

But the really wonderful part was, with the bladder emptying fully, I started to feel better and better. After a month or two I realized I must have been fighting a low grade infection constantly for about 4 years. So I wonder how many others have a similar threshold infection but don't really know it. And it's so very easy to find out. Buy a one dollar catheter. After you think you have voided completely, use the catheter to see whether its true. If so, good, you spent a dollar to find this isn't your issue. If not, you have just found out an important thing and can look forward to being healthier and feeling better. Go see the doctor and take charge of this thing.
Ouch to the Nth. So anyway, things were going OK and I was a happy guy, until 2 years ago when I began to have supersensitivity with my feet. I felt like I was walking on ice gravel. (I solved that problem too - with boots - see main page.) But at this same time this "paresthesia" turned up in another area - my urethra. Ouch. Hurt? Tears would come when catheterizing. Even when I got the skinniest size and went as carefully as possible. So that's when I invented the Water Catheter Kit. A small water pressure pushes the urethra skin aside and allows easy painfree passage of the catheter. How simple and effective it turned out to be. The paresthesia comes and goes, but even when its not to bad I still prefer the Water Catheter routine over the original idea, because it is so much more comfortable. In addition it is much more hygienic, since the tubing reaches to the toilet now and can't splash. It is easier to store and to clean. It is easier to monitor colour and suspensions that one must be careful of with a heavy vitamin and supplement diet because you see a sample in the vial.
Notice to the gals. This page is pretty much advice to the guys. But with the greater female susceptibility to bladder infection, I strongly urge you to test yourself for bladder residual and see if it's something you should deal with. I am advised by an e-mail friend that the gals may have a shorter run, but things are much less accessible. Recommends the Asta-Cath. See also the mirrors and cups sites below. Also, of course, the webreferences collected below speak to both genders.
Links    
WEB Products ehecked and updated links oct 2007
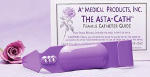
The Asta-Cath. This clever invention assists women to align the catheter correctly even when there may be significant loss of feeling in one's hands. The link is from the Bruce Medical Supply. Check out their generous on-line catalog - everything from wheelchairs and hearing aids to urological supplies.
Clinic/Self-Cath Mirrors. from www.wisdomking.com to see around corners:

Adjustable mirror locks into any position for self-examination, catheterization, dental hygiene or speech therapy. Acrylic 8"-square mirror is on a free-standing 8" x 9 1/2" polyethylene base.
Carola Nilstein of Sweden has an innovative solution. To check out her site, click on the picture left. Pipinette is a small and light potty. Due to its design a woman can pass water standing up. For all these situations when it's more comfortable to stand. A solution to the problem of poor or scarce toilet facilities! Special magic pad causes urine to solidify in approximately one minute. She has guy kits too. Nilstein cleverly uses the chemical used in diapers (vinyl alcohol casing containing superabsorbent polyacrylate) to solidify the urine, when disposal is inconvenient. It's even biodegradable! Check it out.
WEB References ehecked and updated links oct 2007
Controlling Bladder Problems in Multiple Sclerosis by Nancy J Holland, RN, EdD. This e-brochure on the website of the National Multiple Sclerosis Society is an excellent summary of the medical and physical aspects of bladder issues with some fun graphics.
The Joanna Briggs Institute
(Evidence Based Practice Information Sheets for Health Professionals Volume 4, Issue 1, 2000 )
Management of short term indwelling urethral catheters to prevent urinary tract infections: a systematic review Based Nursing and Midwifery by Dunn Pretty & Reid. This Australian study demonstrates that soap and water is as hygenic as any more powerful antimicrobial or antibacterial agent/treatment, and gives intermittent cath an edge over indwelling foley catheters.
Incontact is a leading national organisation that provides information and support to people with bladder and bowel problems, It provides the latest information and services available that will make a difference to your quality of life. It is an extensive resource, including an excellent piece on self-cath.
A few hundred pdf docs are available from the home care pages of Northwestern Memorial in Chicago. These include brief classical instructions on self catheterization. Click Male or Female to view. It's pretty plain they're not written by users, but they are worth reading.
The Kit
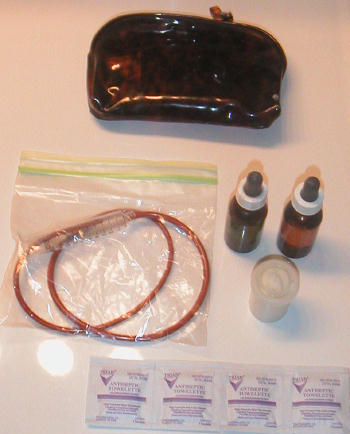
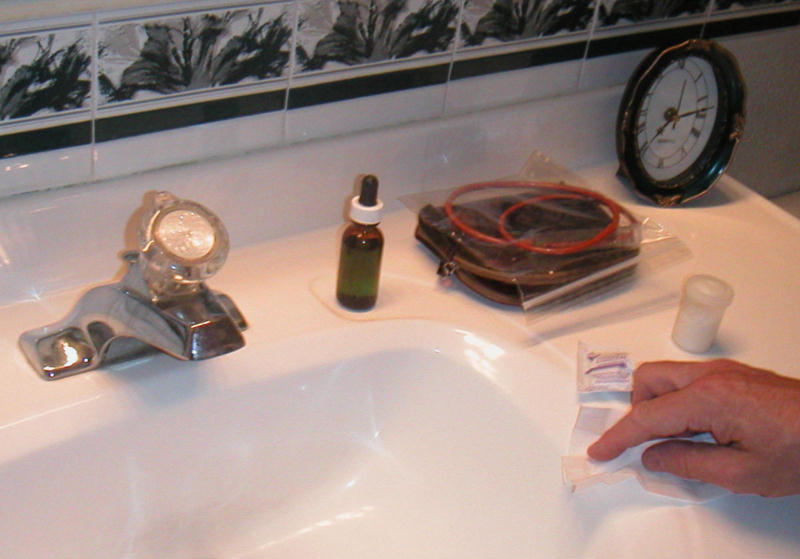
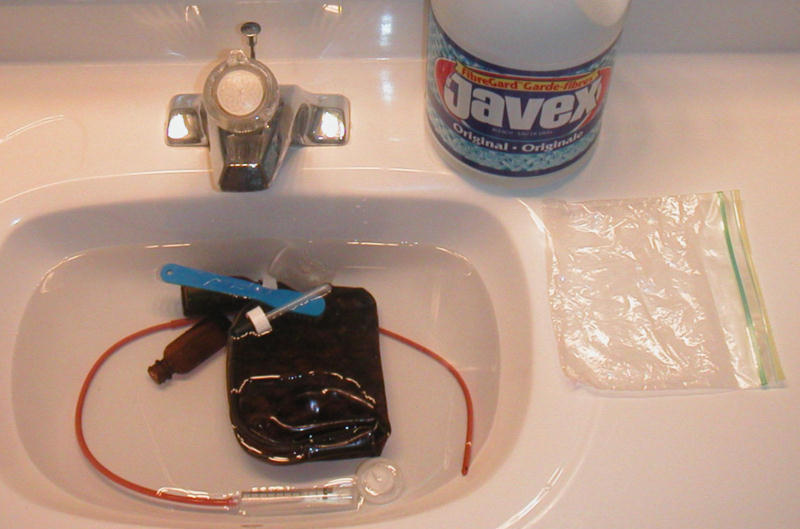
Water Catheter - Pocket Kit One.

The kit is made up so: the Water Catheter in a ziplock sandwich bag, a bottle of water, a bottle of ostomy appliance cleaner (phosphoric acid solution), a container of lotion, 4 antiseptic towellettes, and a plastic pouch as small as still fits into your pocket. I carry it in my back pocket.

This kit is a real boon to your confidence and an alternative to running to the loo every 45 minutes. It is more than sufficiently antiseptic and very cheap.
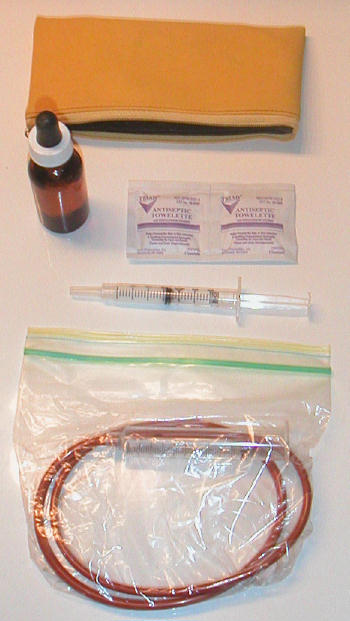
Water Catheter - Pocket Kit Two.

This is the same as above with some small change to reduce the bulk.

It is for when the larger pocket pouch is too large and the minimum equipment is to be carried as for a trip out for dinner or the theatre. Where one or two uses are all that is required before a return home and you want a slimmer more discreet package for your pocket.

The single bottle is water only, and the more slender syringe is used to insert some lotion to ease the passage of the catheter. And a few disinfectant wipes.

When the parasthesia is not being bothersome, and the urethra not so sensitive, I simplify it a bit more. I replace the syringe with a little bottle of lotion and just dip the end of the catheter into it. I also don't bother with the water bottle then. The lotion is enough to lubricate the entry. And the tubing of course is full with urine when complete, so by raising the tubing vertical the few inches of water pressure ensures a gentle withdrawal. Just be careful with the last couple of inches and timing the lowering of the tubing to the toilet.

This fits most readily in your pocket and is easy to maintain.
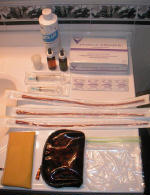
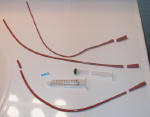
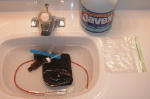
The elements of the kit to purchase at the medical supply store, drug store, or internet store. The brands may change from region to region but here are some of the details. From top to bottom. 1. Ostomy appliance cleaning solution: Urolox - phosphoric acid based. I first used a bleach. But after a few too many little splashs of bleach spoiling sweaters and pants, I found a safer but effective sterilizing cleaner. 2. Package of Antiseptic towellettes. 3. A 35mm film container. 4. 2 eyedropper glass bottles. These worked out as the easiest way to dispense small amounts without leaking. Druggist will sell you empty bottles. 5. A small (3 mm) syringe for kit two for dispensing lotion. 6. A medium syringe (10 mm) to make the catheter assembly. 7. A range of catheters (see below). 8. a couple of pocket zipper bags - must be washable plastic - no lining. 9. Some zip-lock plastic sandwich size bags. This stuff is cheap and cleans easy. The catheters last a couple of months and are only a buck a piece.
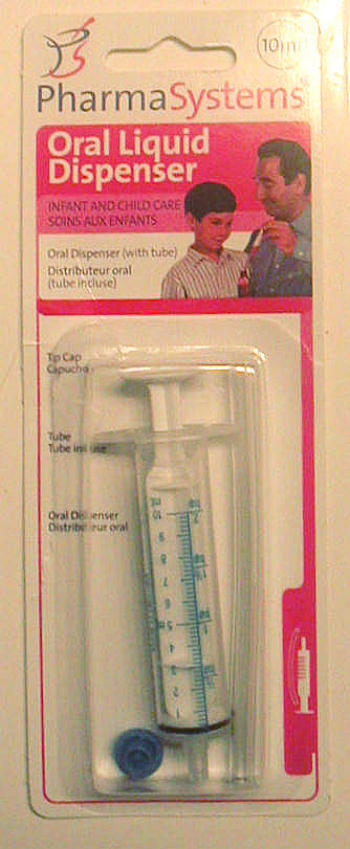
Another sort of syringe that adapts well to the kit purpose. This one is intended to dispense medicine to children and has a snap cap. Very suitable to fit to the catheters. And suitable to dispense lotion since it has a snap cap.
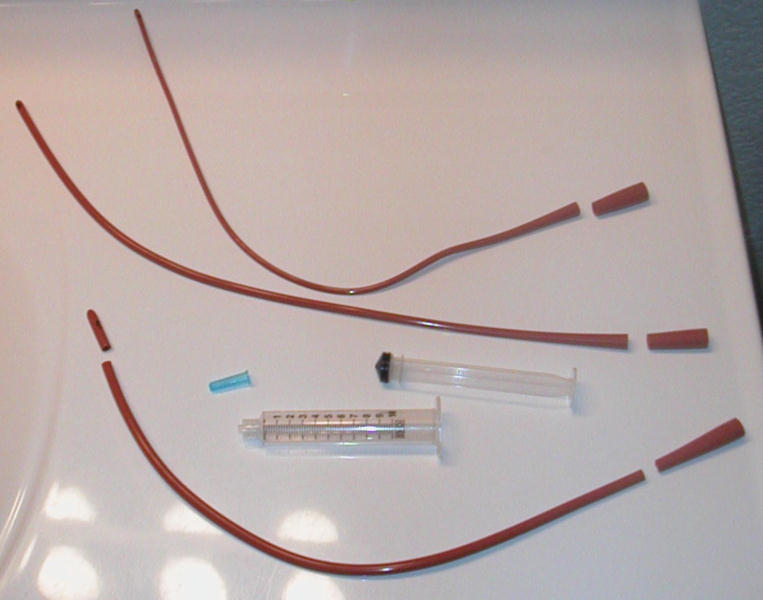
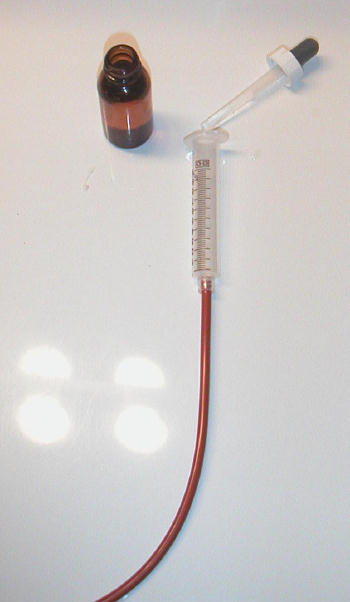
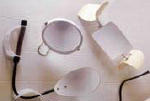
The Water Catheter Elements. The syringe is shown in parts. Discard all but the cylinder which is used as a well for the water. We'll refer to this cylinder as the vial.
Observe the three catheters and the place of their cutting. Detail is clear on larger picture. Click left.
The largest one (Size 16 FR. 5.3 mm) is cut at both ends simply to make an extension tube between the cylinder and the catheter.
The other two catheters are cut only at the funnel end so as to push-fit into the larger one above.
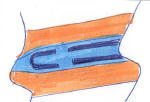
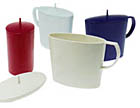
The Water Catheter Assembly. The outer loop shows the principle assembly of syringe cylinder (vial), tubing extension and appropriate catheter. Either of 2 sizes are used. There are occasions when paresthesia makes insertion of the medium size catheter that normally fits the urethra best, most uncomfortable. (Size 14 FR. 4.7 mm in my case). So a smaller diameter catheter is part of the kit and is just press-fitted from time to time to the upper assembly. (Size 10 FR. 3.3 mm). This smaller tube is shown inside the first loop in the picture. You will notice in the larger picture that the smaller catheter tip has been dipped into the lotion to ease entry. Little is required.

In the centre of the picture there is a small syringe for dispensing hand lotion and also a plastic bottle (film container) for the same purpose. Depends on which kit.
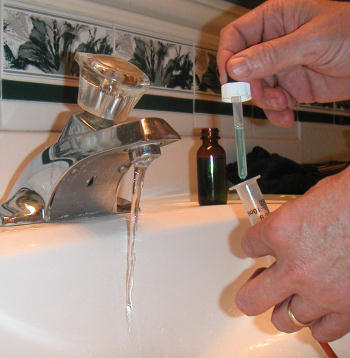
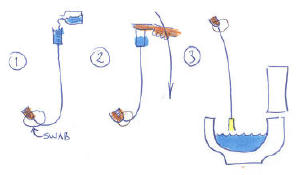
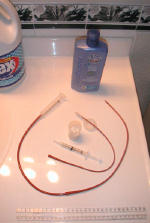
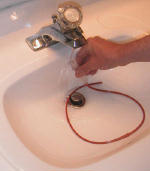
Basic Principle. This photo shows the use of the eye-dropper dispenser bottles, and illustrates the basic concept of the Water Catheter System. By filling the tubing with water and having a vertical elevation of the apparatus, there is a small head of pressure - simply the number of inches of height. This slight pressure of water displaces the immediate area near the catheter inlet holes and prevents actual contact with the tender skin. Then one can insert and remove the tubing without it feeling like a carpenter's chisel scraping along the way. When paresthesia is not a huge bother, you may find the lotion eases the passage sufficiently.

One has control of outflow by placing the thumb over the vial top. At the beginning one can control the water pressure and bypass with thumb-over control. On removal, one contains the 3 ml urine within the tubing and from spilling by thumb-over control.
Safety Risk for the Absent Minded. Please consider whether it is appropriate in your case to have both bottles the same kind as I do. One bottle is filled with a strong blue-coloured acid and the other with clear water. It would be ugly to confuse them. As an alternate, you can skip the Urolox, just rinse with water and wipe the outside with a towellette. Then from time to time, have a more thorough cleaning routine of everything.
Clean up is easy. First wash the outside with soap at the same time you wash your hands. Then run some water through and over the system. Then put in a bit of Ostomy Appliance Cleaner. If you find you can tolerate the easier regime of cleanliness, you can skip this step.
And flush with more water. Use an Antiseptic towellette to wipe down the area you have used for prep and cleanup at the sink. You may also use the towellete to wipe the outside of the tubing. This is a proper courtesy when you are visiting. It is not really required in your normal place, where soap and water are quite sufficient.
From time to time, take everything apart and clean it in soap and water, then soak it a while in a bleach solution. Be sure to include the plastic pocket pouches that contain the kit. Don't keep the zip-lock bags, just replace with new ones.
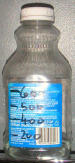
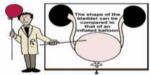
1 Litre Bottle. Take a plastic container of 1 litre volume. Then calibrate it by filling with other containers that are marked as to volume because it's probably not symetrical - note the non-linear numbers on the left illustration. This can be imprecise, say within 10 percent, because it's only a guide.
This simple thing let's you know without the high tech the doctors use to establish what your bladder capacity is, to what degree you are over extending that, and what precisely is the residual amount left. Just pee in the bottle, measure and dump. Then using a catheter, drain the remainder into the bottle, record and dump. The sum of the two drainings is the capacity of your bladder. Do this from time to time to get an average and to see if there are changes or cycles in this matter.
Transfer Bottle. You can also use the bottle to transfer urine to the toilet when at the start this matters are a bit tricky to coordinate.
Clean up the bottle with a good rinsing and then a bit of bleach or Ostomy Appliance Cleaner and another rinse before putting away.
Update
Oct 2007 For the last couple of years, I've simplified the kit a bit. The parathesia has diminished enough that simple lubrication is sufficient. I still use kit 2 above as a pocket kit and for travel, but below is described and shown my present home kit.
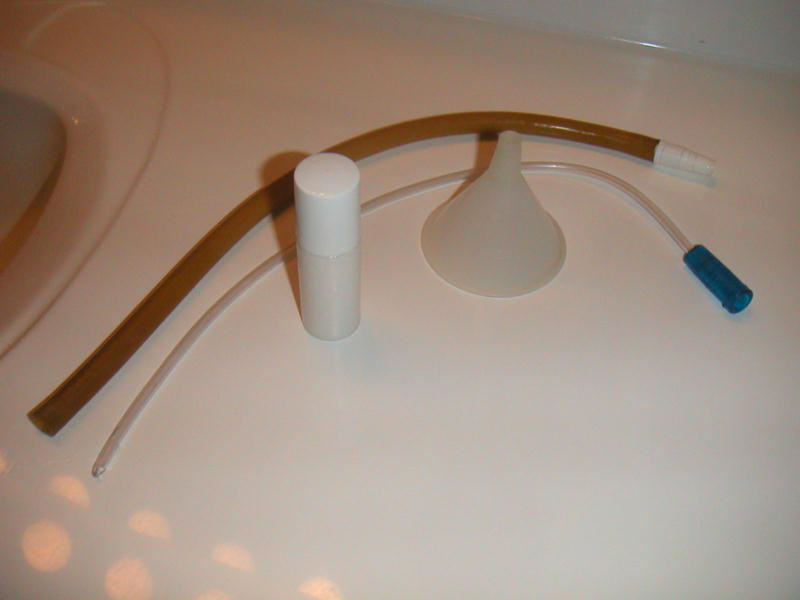
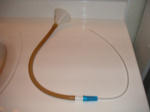
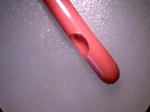
Notice the standard catheter has a flexible female funnel fitting. This fits it to the male fitting used in the catheter business. Note the white fitting at the end of the piece of 1/4 inch surgical tubing. All available at the medical supply houses. The little bottle contains regular hand lotion which is refilled from whatever bottle you might have. The bottle provides a separate place to dip the catheter end into for lubrication. Lastly notice the little 2 inch funnel.
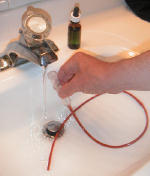
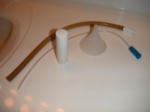
Here the pieces are put together in the form for regular use. The funnel gives some weight to the apparatus towards the toilet bowl. It also facilitates cleaning later. The larger diameter tubing of the bit of surgical tubing is quite a bit less resistance than joining two catheter tubes as above, and makes for less total time.
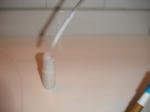
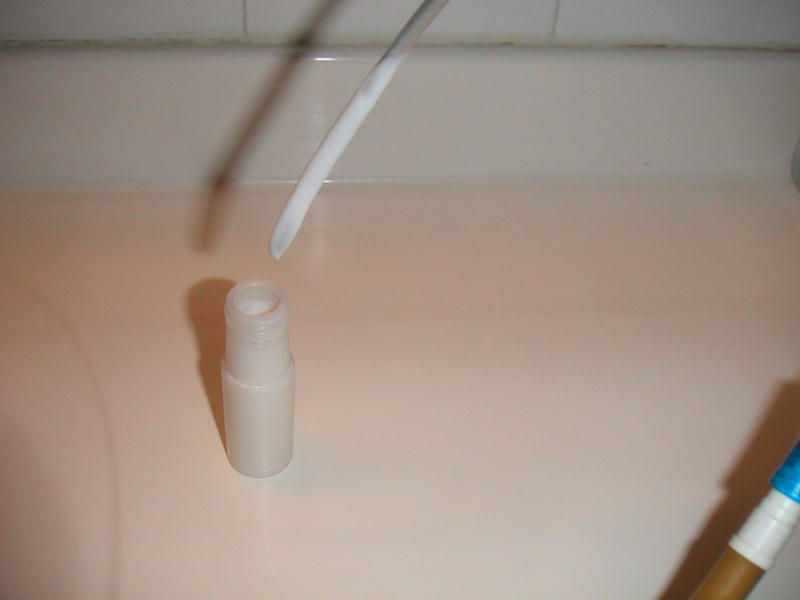
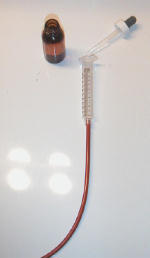
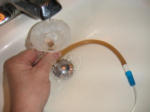
Here is the business end of the catheter after dipping in the lotion. The little bottle is just the right thing for this purpose. I use such a little bottle now in the pocket kit above as well rather than a little syringe.
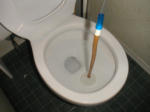
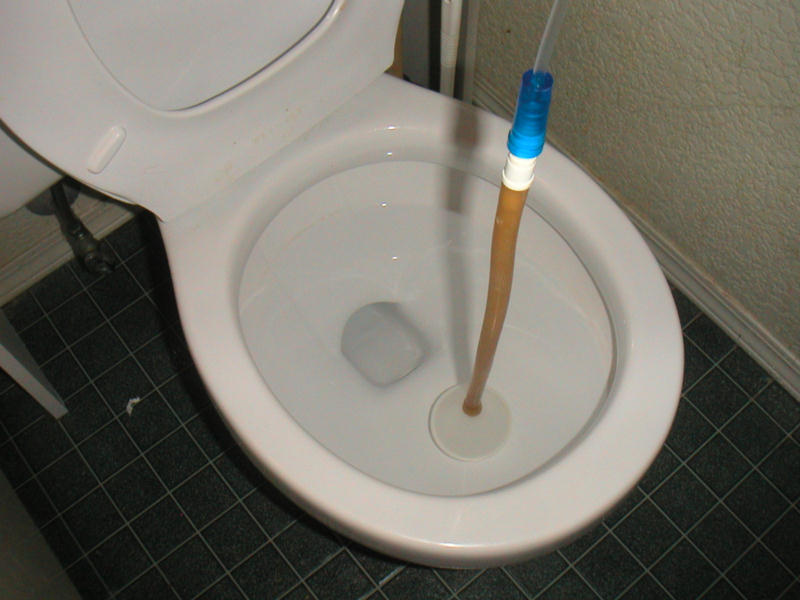
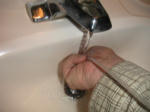
Here is an indelicate shot. Sorry. But you can readily see that the urine is delivered in a convenient non-splash way where it needs to go. When done, one elevates the funnel upwards in front of the chest. That creates a small water pressure displacement of the urethra wall near the catheter holes, and greatly eases withdrawal. Just be sure to stop at the last few inches and put the funnel-end lower than the catheter-tip-end so the amount in the tubing is not spilt but dispatched cleanly.
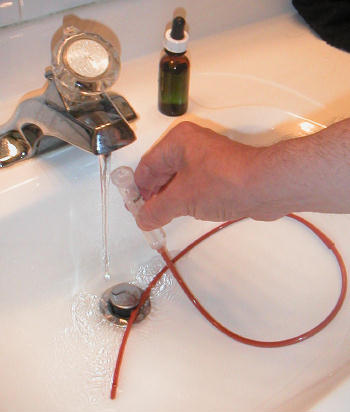
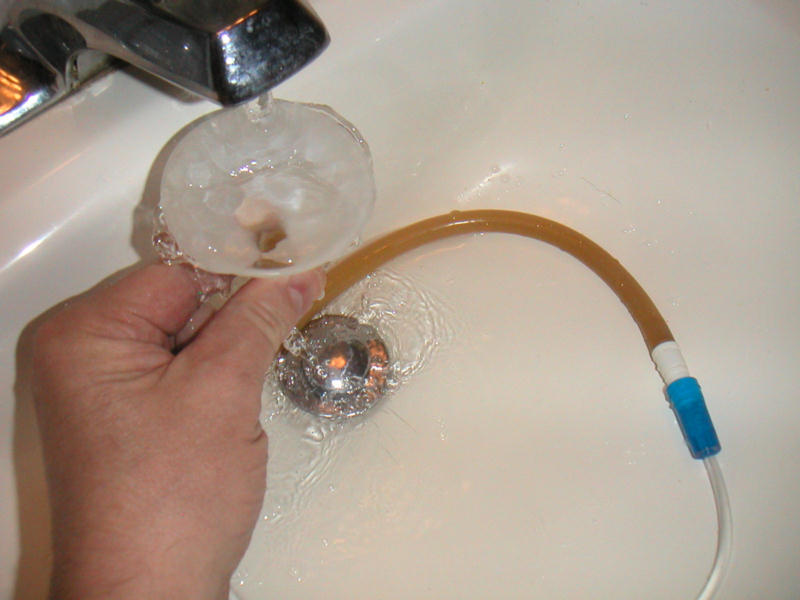
This is how easy it is to clean up. Just rinse for a minute thusly.
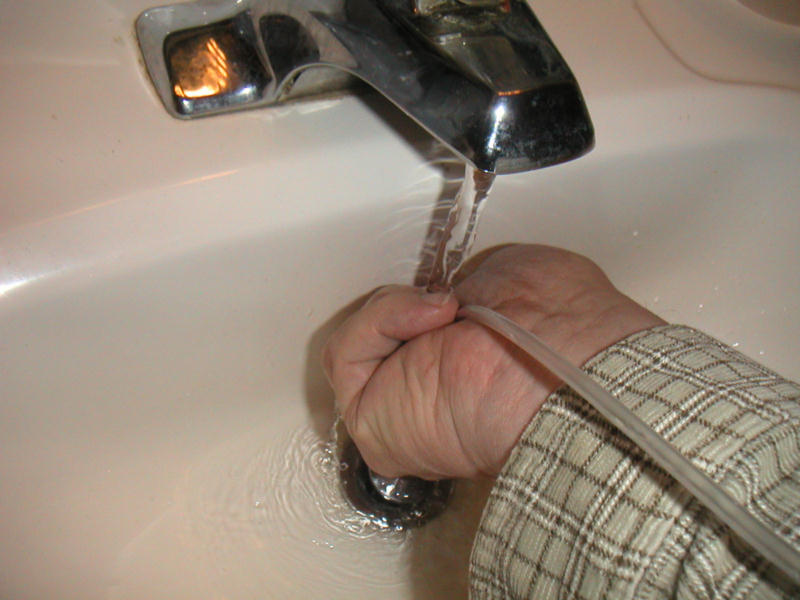
And then soap your hands and before rinsing your hands wash to outer part of the kit and rinse so.

I don't even contain it any longer in a bag, but toss it into the appointed drawer.
Update August 2010 A Catheter Improvement Method Inventor's Own Descriptions
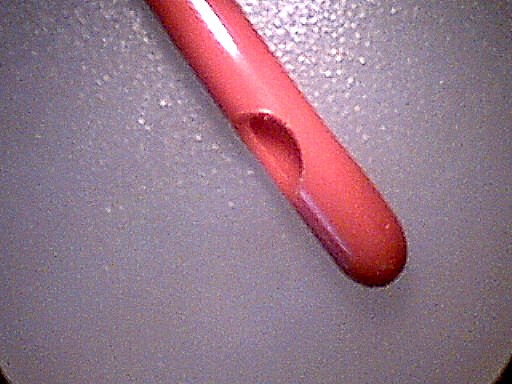
Charles T. Tart, Palo Alto, California, has found a nice trick for dulling the knife edges on plastic catheters. He sends a couple of photos and a description to share. For a fuller discription click link above. On the left is a shot of the sharp edges new catheter.
This shot shows the catheter having been modified by the heat of a soldering iron to soften the contours of the hole. "It feels enormously better than the factory edges." he says. I coil my latex catheter up in a wide-mouthed bottle of rubbing alcohol in between uses and so one catheter can last a year or more. It's important to dry it off and drain it before use, of course, you don't want alcohol in the urethra drying out the flesh..
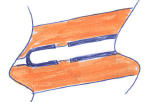
Practical Matters 
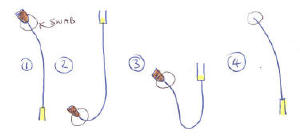
Some practical details follow for which some tasteful sketches replace indelicate pictures.
Pressure. You can even measure the bladder pressures. Pressure is complicated stemming from blood pressure and complex kidney processes. The pressure is not that great - around 20 inches of water - in the same range as the water catheter kit. Just stop the flow by elevation of the vial. The pressure in inches of water is simply the elevation from the bladder location behind the pubic bone. Engineering doesn't get any simpler. No need for skinny electronic sensors at all.
In the sectional sketch to the left you can see how the soft flesh of the urethra intrudes easily into the side holes of the catheter. So with entry and exit, the sharp right angles of the catheter holes scrape. This hurts. A lot sometimes. In this sketch, I have shown how a little water pressure acts to distend the flesh away from the catheter a little bit, and in this, the sharp edge of the holes is no longer a hurtful problem.
At Home. One is much more free at home than in public places. The bathroom sink is a place to practice, prep and clean up. The toilet is the place to discharge but you can also use the 1 Litre Bottle as a transfer jar. Be fastidious about your procedures and cleanliness, both for your own safety and that of others.
In Public Places. If you are in a public washroom and cannot use a sink for the sake of appearances, then adapt to cubicle use. Use your bottles of lotion, water and cleaner - they are sufficient size though you will want later to replentish the water bottle. Then use an Antiseptic towellette to wipe the outside of the apparatus before returning it to your pocket pouch.
Insertion. Either dip the catheter into the lotion container, or to use the syringe to insert about 1/2 ml of lotion directly into the urethra opening. I use the syringe in the pocket kit, and the dipping container at home on the sink counter where it is more convenient. A little lubrication is sufficient most often and only when the urethra is super sensitve is the next step with water pressure required. If paresthesia isn't an issue for you, then skip over those parts.
Prostate. Continue the insertion. After about 6 inches you come to the area of your prostate gland. The gland surrounds the urethra for an inch or so and as we grow older there may be some restriction here. You may have then to slip and slide a bit to get past. There is another interesting phenomena to note. This seems the location of the male "G-spot" so this exercise is sometimes not without reward! Similarly, this issue is only required because our nerves are all mixed up. Similar signals and feelings that are associated with normal urination will sometimes occur at inappropriate times during catheterization. Relax. It's only your damaged brain, it's not real. And if you relax it doesn't hurt any, but can be rather satisifying. You'll even have a rather secret sort of experience that others won't ever have.
Stuck Valve. Then to the entrance to the bladder. You may want to mark the catheter with a marker pen at the place to make this a little easier at the start and to particularly differentiate this place from the previous place. Average is 8 inches. It is the nature of this nerve problem that the sphincter is getting a permanent "close" signal so it takes a little patience to get through sometimes. The larger sizes of catheter have a bit more rigidity and are less trouble, but the smaller sizes have less lateral stability. But just keep with it and eventually you'll learn how to deal with these occasions. Gosh knows how the people who help us when we cannot manage things ourselves can ever tell what's happening inside another person! Now in my own case, I can urinate a bit. My maximum bladder capacity is 750 ml and 500 ml is always left behind. (That's why I do this.) But if I have eliminated what is possible naturally, the bladder sphincter is a bit less stuck and the catheter passes more easily.
Paresthesia. Add some water from the eyedropper bottle, until it partly fills the vial. As you raise the cylinder, water will issue from the catheter holes slightly and enable you to continue the insertion with minimal discomfort and hopefully without pain. It is however a bit like patting your head and rubbing your belly at the same time, what with all that's going on. When things are at their most sensitive, I fill the vial with water, cover it with my thumb (so the water release is controllable) and then commence insertion with water flowing. A bit messy but it makes the process possible without a general anesthetic. Often, one can insert about 3 inches and then the water pressure won't leak back to the outside but just push the flesh aside so it doesn't hurt. The inflamation of the urethra during bacterial infection of the bladder also hurts like hell. This system is excellent for that situation also.
Starting Stage. Note the swab of toilet tissue in each subsequent sketch. Without paresthesia, simply start at 3.

Sketch 1. How the water pressure facilitates entry. If possible stand over sink. Water must fill tubing before insertion or you will have trapped air.

Sketch 2. When against the sphincter and nearly ready, cover the vial end with the thumb and lower the assembly.

Sketch 3. From this situation, push the catheter through the sphincter to start the flow of urine. The vial will stabilize the assembly and weight it down slightly. It conveniently is just over the water of the toilet bowel and so will not splash.
Empty. Now the next part is rather obvious, but needs a bit of planning since it's easy here to be distracted and make a mess. As soon as you get through the sphincter, well of course the bladder will empty, but at the end of this rather long tube. You can easily do this sitting, simply looping the tubing and discharge into the bowl completely in control as you hold the vial directed down. I prefer to stand over the toilet. Since the apparatus extends about 30 inches, it nicely reaches into the bowl but above the water, and the weight of the vial holds the catheter tubing nicely vertical and steadies it.
Time. It takes about 2 minutes to drain the bladder with the Size 14 and about 7 minutes with the Size 10. (Sketch 1)
Finish. Now into reverse. This isn't as easy as it sounds either! There are two issues: paresthesia again, and residual urine in the tube. So we pressurize during withdrawal stage 1, and then stop with 3 inches to go to deal with the residual amount of about 3 ml.
Withdrawal - Stage 1. Elevate the vial as high as you can. (Sketch 2) The residual urine kept in the tubing until the end is free. But elevated, it provides perhaps 20 inches of water pressure which will nicely again push the flesh of the urethra away from those nasty chiselled edges of the catheter holes, so you can withdraw the tubing. It will not escape up the wall sides - there is no leakage except at the last. A swab of toilet tissue at the entrance will wipe the lotion from the tubing and help keep things neat at each stage.
Withdrawal - Stage 2. Stop when there is 3 inches left inside. You may want to make a marker pen ring on the catheter rubber to make this a bit easier to tell. Lower the vial to the same height as the other end, so there is no pressure any more. (Sketch 3) Withdraw the last bit. Now lower the vial and dump the last bit. (Sketch 4) And cleanup.
Done There we are then. All done. More complicated than you'd think hey? At least it's cheap.

Disclaimer Thing  I make no claims that this is safe or whatever. I'm not a doctor. I share my experience because there is nothing out there like this. And when I looked for help there was none and it seems nobody talks about this indelicate subject. I give you my experience, research, reasons, the details of my kit, the practical elements of self cath and wish you well. So there.

15 December 2002, update 8 Oct 07